How to Make Malabari Chicken Biryani: A Flavorful and Unique Recipe
Unleash the fiery flavors of Kerala! Learn to make Malabari Chicken Biryani, a fragrant rice dish bursting with spices, tender chicken, and crispy shallots. Easy-to-follow steps for an unforgettable culinary adventure.
 admin
admin
Malabari Chicken Biryani Recipe: A Masterclass
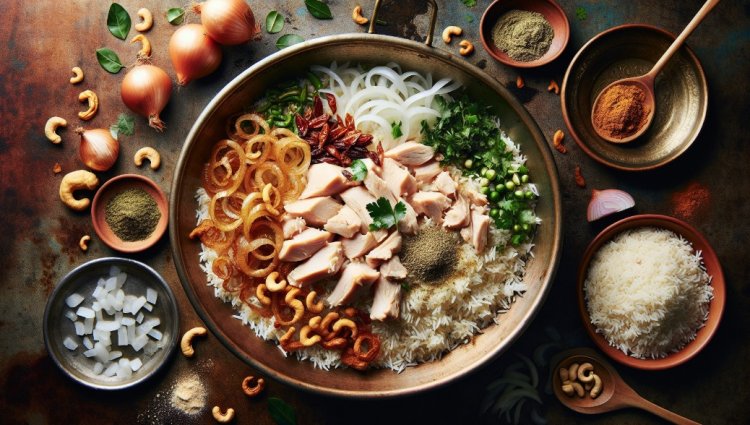
Ingredients:
-
Chicken pieces
-
Long-grain rice (preferably Kaima rice)
-
Onions, thinly sliced
-
Tomatoes
-
Curd (yogurt)
-
Ginger, garlic, and green chilies crushed
-
A special masala made from Kerala spices
-
Coriander leaves
-
Fried cashews
-
Garam masala
-
Rose water and saffron (optional)
-
Salt
-
Oil and ghee
-
Dough for sealing
Instructions:
-
Make the Masala:
-
Heat oil and ghee in a copper vessel with a thick bottom.
-
Sauté thinly sliced onions until transparent.
-
Add chicken, salt, ginger, garlic, and green chilies.
-
Once the chicken turns white, mix in the tomatoes and curd.
-
Cook thoroughly, then add fried onions and Kerala's special masala.
-
Garnish with coriander leaves.
-
-
Fry onions separately.
-
Fry additional onions in oil until golden brown.
-
These can be used to enhance the biryani and other curries.
-
-
Prepare the rice.
-
Wash kaima rice thoroughly.
-
Fry in oil and ghee for a crispy texture.
-
Cook with water and salt until the water is absorbed.
-
Let the rice rest for 10 minutes.
-
-
Assemble the Biryani:
-
Layer the cooked rice over the chicken masala.
-
Add fried cashews, onions, and garam masala.
-
Optionally, sprinkle rose water and saffron.
-
Seal the vessel with dough.
-
-
Cook on Dum:
-
Cook the sealed biryani on low heat for 10–15 minutes.
-
Allow the flavors of meat and rice to infuse together.
-
-
Serve:
-
Gently mix the biryani before serving.
-
Enjoy hot with raita, Indian spicy pickles, or your choice of side.
-
FAQ:
-
Can I use powdered salt? Yes, but rock salt adds a unique flavor.
-
Can I use pre-packaged spices? Yes, but the special masala has an authentic taste.
-
Can I substitute kaima rice with basmati rice? Yes, but kaima rice offers a distinct texture.
-
What if my rice turns out to be sticky? Ensure the correct rice-to-water ratio, and try rinsing the rice before cooking.
Here is how you can make raita for your biryani.
Raita Recipe: A Refreshing Yoghurt Side Dish
Ingredients:
-
2 cups of plain yoghurt
-
1 cucumber, grated or finely chopped
-
1 small onion, finely chopped (optional)
-
2 tablespoons fresh coriander leaves, chopped
-
1 teaspoon roasted cumin powder
-
1/2 teaspoon red chili powder (adjust to taste)
-
Salt to taste
-
A pinch of black pepper (optional)
-
1/2 teaspoon sugar (optional)
-
Mint leaves for garnishing
Instructions:
-
Prepare the yogurt (curd).
-
In a bowl, whisk the yogurt until it becomes smooth.
-
If the yogurt is too thick, you can add a little water or milk to thin it to the desired consistency.
-
-
Add Cucumber and Onion:
-
Stir in the grated or finely chopped cucumber.
-
Add finely chopped onions if you prefer an extra crunch and flavor.
-
-
Season the Mixture:
-
Mix in the roasted cumin powder, red chili powder, salt, and black pepper.
-
Adjust the seasoning according to your taste.
-
If you like a slight sweetness in your raita, add sugar.
-
-
Mix in Herbs:
-
Add chopped coriander leaves to the mixture.
-
You can also use mint leaves if you prefer a minty flavor.
-
-
Garnish and Serve:
-
Garnish with a few mint leaves on top for a fresh look.
-
Serve the raita chilled as a cooling side dish with biryanis, pulao, or any spicy Indian meal.
-
Variations:
-
Boondi Raita: Add boondi (tiny fried gram flour balls) to the yogurt mixture.
-
Fruit Raita: Mix in diced fruits like pomegranate, pineapple, or apple for a sweet version.
-
Tomato Raita: Add chopped tomatoes and omit the cucumber for a tangier flavor.
-
Spinach Raita: Add blanched and chopped spinach for a healthy twist.
Tips:
-
For the best taste, use fresh, thick yogurt.
-
If the raita is too spicy or tangy, adding a bit of sugar can balance the flavors.
-
Always add salt to prevent the raita from becoming watery.
Enjoy your homemade raita as a delicious, cooling accompaniment to your favorite Indian dishes!
Here is a detailed description of how to make Malabar Chicken Dum Biryani.
Introduction
Welcome to my new episode of Masterclass! In response to popular demand, I will be doing a Malabari chicken biryani in English. Malabari chicken biryani is a flavorful and unique dish that has gained a lot of popularity. Unlike other chicken biryanis, it has a distinct flavor profile that sets it apart.
Malabari biryani is known for its long-grain rice and the way it is cooked. There are two types of Malabari biryani: biryani and talishiri biryani. Today, I will be teaching you how to make Telliseri ( A town in Kerala, India) biryani, which involves cooking the rice and meat separately and then combining them in a process called dum to create a delicious biryani.
To start, we will make the masala for the biryani. I recommend using a copper whistle with a thick bottom for the best results. Heat some oil and ghee in the vessel, and sauté thinly sliced onions until they are transparent. This step is crucial as it allows the onions to fully merge into the biryani, enhancing its flavor. Add the chicken pieces, salt, and a mixture of crushed ginger, garlic, and green chilies after that. Cook the chicken until it turns white, and add tomatoes and curd for additional flavor.
While the chicken cooks, we will fry onions separately to add a different flavor to the biryani. This fried onion can also be used to enhance other curries in the future. Once the chicken is cooked, add the fried onions and a special masala made from Kerala's own spices. Finish off by adding coriander leaves and letting the flavors meld together.
Now, let's move on to the rice. We will be using kaima rice, a small-grain rice that is famous in Malabar. Start by frying the rice in oil and ghee to give it a crispy texture. Add salt and water, cover the pan, and let the rice cook on high heat. Once the water is absorbed, turn off the heat and let the rice rest for 10 minutes to allow the inner part to fully cook.
Finally, it's time to assemble the biryani. Layer the cooked rice on top of the chicken masala, adding fried cashews, onions, and garam masala for extra flavor. You can also add a touch of rose water and saffron for a delightful aroma. Seal the vessel with dough and cook on low heat for about 10 to 15 minutes to create the dum effect, where the flavors of the meat and rice infuse together.
And there you have it—a delicious and flavorful Malabari chicken biryani ready to be enjoyed!
Making the Masala
When it comes to making a delicious Malabari chicken biryani, the first step is to prepare the masala. The choice of vessel plays a crucial role in the cooking process. It is recommended to use a vessel with a thick bottom, such as a copper whistle, for the best results. This type of vessel ensures even heat distribution, resulting in perfectly cooked biryani.
Once you have a suitable vessel, heat some oil and ghee in it. Then, sauté thinly sliced onions until they become transparent. This step is important as it allows the onions to fully merge into the biryani, enhancing its flavor. It's worth taking the time to ensure that all the onions are evenly cooked.
Next, add the chicken pieces and salt to the vessel. It is important to use smaller chicken pieces for the biryani, as they cook more evenly and result in a more flavorful dish. Once the chicken turns white, add a mixture of crushed ginger, garlic, and green chilies for added flavor.
As the chicken cooks, you can prepare the fried onions separately. These fried onions will contribute a different flavor to the biryani and can also be used to enhance other curries in the future. Once the chicken is cooked, add the fried onions and a special masala made from Kerala's own spices. This unique blend of spices adds a distinct flavor to the biryani.
Finish off the masala by adding fresh coriander leaves and letting the flavors meld together. The masala is now ready to be combined with the rice to create the biryani.
Now that you have learned the step-by-step process of making the masala, you are well on your way to creating a flavorful and unique Malabari chicken biryani. Stay tuned for the next section, where we will explore how to cook the rice and assemble the biryani.
Frying the onions
Frying onions is an important step in making a flavorful Malabari chicken biryani. The process of sautéing thinly sliced onions until they become transparent allows the onions to fully merge into the biryani, enhancing its flavor. Taking the time to ensure that all the onions are evenly cooked is crucial to achieving the desired taste.
When frying the onions, it is essential to achieve the right color and texture. The color of the onions can vary depending on the type of meat used in the biryani. For chicken biryani, a golden brown color is desirable. To achieve this, the onions should be fried until they reach a golden brown hue. It is important to keep an eye on the onions while they are frying to prevent them from burning.
Utilizing the flavourful oil from frying the onions is another way to enhance the flavor of future cooking. The oil absorbs the onion's essence and can be used in other curries to add depth and richness. Keeping a reserve of flavoring oil can save time and effort in future cooking endeavors.
Fried onions can also be used specifically to enhance the flavor of the biryani. Once the chicken is cooked, the fried onions can be added to the meat mixture, adding a different flavor profile to the overall dish. The combination of fried onions, chicken, and spices creates a harmonious blend of flavors that makes the biryani truly delicious.
Frying the onions is a crucial step in the process of making a flavorful Malabari chicken biryani. It adds depth and richness to the dish, enhances the overall flavor, and creates a more enjoyable culinary experience. So, don't skip the step of frying the onions; it's well worth the effort!
Preparing the rice
When it comes to making Malabari biryani, choosing the right rice is crucial. Kaima rice, a small-grain rice that is famous in Malabar, is the perfect choice for this dish. Its small size and texture make it ideal for absorbing flavors and creating a fluffy and aromatic biryani.
Before cooking the rice, it is important to wash it thoroughly to remove any impurities or excess starch. This step ensures that the rice cooks evenly and results in a nice, fluffy texture.
To enhance the texture and flavor of the rice, we will fry it in oil and ghee. This frying process gives the rice a crispy outer layer and adds a delicious nutty flavor. It also helps the rice grains separate and prevents them from sticking together.
Once the rice is fried, it's time to cook it with the right amount of water and salt. For every cup of rice, you will need two cups of hot water. This ratio ensures that the rice cooks perfectly and absorbs the flavors of the spices and masala.
Add salt to the rice while it is cooking to enhance its taste. Start with a small amount and adjust according to your preference. Remember, you can always add more salt later, but you can't take it away once it's added.
Cover the pan and let the rice cook on high heat until the water is absorbed. Once the water is absorbed, turn off the heat and let the rice rest for 10 minutes. This resting period allows the inner part of the rice to fully cook and results in a perfectly cooked and fluffy biryani.
Now, the rice is ready to be layered with the chicken masala to assemble the biryani. The fried rice will add a crispy and flavorful element to the dish, while the chicken masala will infuse the rice with its aromatic flavors.
By following these steps and preparing the rice with care, you can ensure that your Malabari biryani turns out to be a flavorful and delicious dish that will impress your family and friends.
Combining the masala and rice
Now that we have prepared the flavorful chicken masala and cooked the fragrant rice, it's time to combine the two to create the delicious Malabari chicken biryani. The process of layering the cooked chicken masala and rice requires some careful assembly to ensure that the flavors are evenly distributed.
To begin, take a serving dish or a large pot and start by layering the cooked chicken masala at the bottom. Spread it evenly to create a solid base for the biryani. This layering technique allows the rice to absorb the flavors of the masala as it cooks.
Next, add a generous amount of fried cashews and onions on top of the masala. These ingredients not only add flavor but also provide a delightful crunch to the biryani. Sprinkle some garam masala over the mixture to enhance the overall taste.
If you prefer a spicier biryani, you can also include some chopped green chilies and minced garlic at this stage. These ingredients will infuse the dish with an extra kick of heat and flavor.
For an added touch of freshness, garnish the biryani with a handful of chopped coriander leaves. The vibrant green color and herbal aroma will complement the other flavors in the dish.
If you have rose water on hand, you can drizzle a small amount over the layers of masala and rice. This will give the biryani a subtle floral fragrance that adds a unique element to the overall experience.
Now that the layers are complete, it's time to explain the concept of dum. Dum is a cooking technique where the biryani is sealed with dough or foil and cooked on low heat. This process allows the flavors of the meat and rice to meld together, creating a rich and aromatic dish.
Seal the serving dish or pot with dough, making sure to seal any gaps or openings. This will trap the steam and help infuse the flavors into the biryani. If you don't have dough on hand, you can also use aluminum foil to tightly cover the dish.
Place the sealed dish on low heat and let it cook for about 10 to 15 minutes. This slow cooking process allows the flavors to develop and results in a biryani that is moist, tender, and bursting with flavor.
Once the cooking time is complete, remove the dough or foil and give the biryani a gentle mix to ensure that all the flavors are well combined. Serve the biryani hot and enjoy the delightful blend of spices, tender chicken, and fragrant rice.
Combining the masala and rice is the final step in creating a flavorful and unique Malabari chicken biryani. The layering of the masala, the addition of fried cashews and onions, and the concept of dum all contribute to the depth of flavors in this beloved dish. So gather your ingredients, follow the steps, and indulge in the deliciousness of a homemade Malabari chicken biryani!
FAQ
Here are some frequently asked questions about making Malabari chicken biryani:
Can I use powdered salt instead of rock salt?
Yes, you can use powdered salt as a substitute for rock salt in the recipe. However, keep in mind that rock salt adds a unique flavor to the biryani, so using it will provide a more authentic taste.
Can I use pre-packaged spices instead of the special masala?
While you can use pre-packaged spices, using the special masala made from Kerala's own spices will give the biryani a distinct and authentic flavor. The special masala is carefully curated to enhance the taste of the biryani, so using it is recommended for the best results.
Can I use basmati rice instead of kaima rice?
While kaima rice is traditionally used in Malabari biryani, you can use basmati rice as a substitute. However, keep in mind that kaima rice has a smaller grain size and a unique texture that enhances the overall taste and aroma of the biryani. Using kaima rice will give you a more authentic Malabari biryani experience.
What can I do if my rice turns out sticky or overcooked?
If your rice turns out sticky or overcooked, it could be due to using the wrong type of rice or not following the cooking instructions correctly. To prevent this, make sure to use the recommended rice variety and measure the water accurately. Also, allow the rice to rest for 10 minutes after cooking to ensure the inner part is fully cooked. If your rice still turns out sticky, you can try rinsing it before cooking or adjusting the water-to-rice ratio. Experimenting with different cooking techniques and rice varieties can help you achieve the desired texture in your biryani.